코틀린은 이 언어로 프로젝트를 만들기 위해서 배우는 중이에요!
1학기 때는 문법을 중심적으로 배웠고, 2학기는 안드로이드를 중심으로 더 자세하게 배울 생각입니닷
실무에 도움 되는 것을 배운다는 생각에 굉장히 들뜨고.. 신납니닷. (*^-^*)
오늘은 안드로이드가 깔리지 않은 친구들이 많아서 진도를 많이 나가지 않았어요~
<?xml version="1.0" encoding="utf-8"?>
<LinearLayout xmlns:android="http://schemas.android.com/apk/res/android"
    xmlns:app="http://schemas.android.com/apk/res-auto"
    xmlns:tools="http://schemas.android.com/tools"
    android:id="@+id/main"
    android:layout_width="match_parent"
    android:layout_height="match_parent"
    android:orientation="vertical"
    android:background="#FFFFCC"
    tools:context=".MainActivity">

    <TextView
        android:layout_width="wrap_content"
        android:layout_height="wrap_content"
        android:text="Hello World!"
        app:layout_constraintBottom_toBottomOf="parent"
        app:layout_constraintEnd_toEndOf="parent"
        app:layout_constraintStart_toStartOf="parent"
        app:layout_constraintTop_toTopOf="parent" />

    <Button
        android:id="@+id/button2"
        android:layout_width="match_parent"
        android:layout_height="wrap_content"
        android:text="OK 확인" />

    <CheckBox
        android:id="@+id/checkBox"
        android:layout_width="match_parent"
        android:layout_height="wrap_content"
        android:text="요맘때" />

    <CheckBox
        android:id="@+id/checkBox2"
        android:layout_width="match_parent"
        android:layout_height="wrap_content"
        android:text="메로나" />


</LinearLayout>
이건 xml 코드예요! 기존 코드에서 별로 손댄 것은 없지만 간단하게 소개해 보겠습니당.
우선 layout 을 LinearLayout 으로 바꿔주었어요. 그래서 요소 마다마다 느낌이라고 해야 하나 아무튼 각자각자 느낌으로 바꿔주었습니다.
그리고 저희가 간단하게 만들 페이지는 수직적으로 정렬이 되어있어서 기본값인 android:orientation 을 "vertical" 로 바꿔주었답니당.
그리고 배경색을 연한 노란색으로도 지정해 주었어요.
그리고 버튼을 만들어주었는데요! width 는 부모 요소에 맞춰서 설정해 줬고, height 는 그 간격(?) 그런 느낌에 맞춰서 wrap_content 라고 작성해 줬습니다! 버튼 내부 글자는 "OK 확인" 이라고 입력해 줬어용
체크 박스도 이와 비슷한 원리로 만들었습니당. 좋아하는 아이스크림을 고르기 위해 옵션만 바꿔줬습니당.
package com.example.buttonpractice

import android.os.Bundle
import android.widget.Button
import android.widget.Toast
import androidx.activity.enableEdgeToEdge
import androidx.appcompat.app.AppCompatActivity
import androidx.core.view.ViewCompat
import androidx.core.view.WindowInsetsCompat

class MainActivity : AppCompatActivity() {

    lateinit var button : Button

    override fun onCreate(savedInstanceState: Bundle?) {
        super.onCreate(savedInstanceState)
        enableEdgeToEdge()
        setContentView(R.layout.activity_main)

        button = findViewById(R.id.button2)
        button.setOnClickListener {
            Toast.makeText(applicationContext, "버튼 클릭~~~~", Toast.LENGTH_SHORT).show()
        }

        ViewCompat.setOnApplyWindowInsetsListener(findViewById(R.id.main)) { v, insets ->
            val systemBars = insets.getInsets(WindowInsetsCompat.Type.systemBars())
            v.setPadding(systemBars.left, systemBars.top, systemBars.right, systemBars.bottom)
            insets
        }
    }
}
이것은 kt 파일입니당.
제가 추가한 부분은 우선 lateinit var button : Button 인데용...
1학기 때 배웠던 것을 생각해 보면 변수 선언? 느낌이 나지만 lateinit 가 무엇인지 몰라서.. 함부로 설명할 수가 없습니당...
아직 설명을 안 해주셔서 다음 차시에 자세히 적겠지만 지금은 저의 생각을 읊어볼게용!
그리고 button 에 제가 xml 파일에서 지정한 아이디 button2 를 찾아서 이 값을 button 에 넣어줍니당.
그래서 이 버튼을 클릭하였을 때 Toast 해 줍니다. 사실 Toast 가 뭔지 몰라서... 그 줄의 코드는 아직 잘 모릅니다.
하지만 LENGTH_SHORT 는 _LONG 도 있는데 짧게 나오게 할 것인지, 길게 나오게 할 것인지를 조절할 수 있다고 합니다.
그리고 이를 화면에 보여주기 위해 .show() 를 해서 화면에 보이게 합니당
아직 Toast.makeText 와 applicationContext 는 잘 몰라서 죄송합니당.... 제 생각에는 버튼을 눌렀을 때 나오는 글자를 저렇게 넣어준 것 같기도 합니당.. 허허...
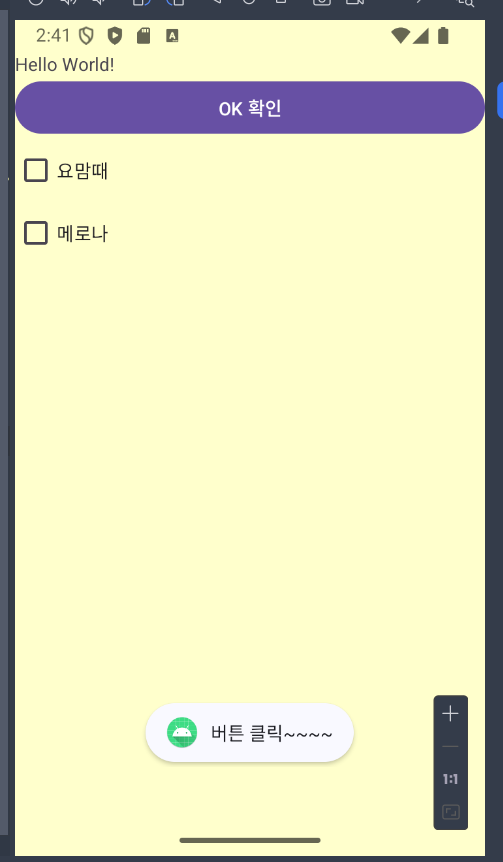

이렇게 버튼을 누르면 버튼 클릭이 뜹니당.
제가 작성한 코드로는 이 정도의 구현이 가능하고 더 성장해서 오도록 하겠습니당.
까먹은 내용이 있어서 다시 돌아왔습니당.
바로 개발 순서인데유.
우선 안드로이드 프로젝트를 생성한 후, 화면 디자인 및 편집을 합니당.
이게 바로 .xml 파일을 만든다는 개념으로 생각하시면 됩니당.
그리고 Kotlin 코드를 작성 및 수정합니다. 이것은 바로 .kt 이겟죠?
마지막으로는 프로젝트 실행 및 결과를 확인하시면 됩니당.
생각보다 별로 안 중요한 것 같지만 이것이 개발의 기초이기 때문에 꼭 알아두셔야 합니당.
모두 아좌좌!!!!!!!!!!!
'레쭈고 코틀린' 카테고리의 다른 글
| Kotlin 6차시 (3) | 2024.09.27 |
|---|---|
| Kotlin 5차시 (0) | 2024.09.26 |
| Kotlin 4차시 (3) | 2024.09.13 |
| Kotlin 3차시 (1) | 2024.09.06 |
| Kotlin 2차시 (1) | 2024.09.04 |