항상 코틀린을 들어야 할 시간이 오면 잠이 몰려 와 집중이 잘 되지 않지만 최대한의 집중력을 발휘해서 수업을 듣습니닷...
오늘은 계산기의 기능 중 아주 간단한... 더하기 기능만 만들어보았는데용
코틀린으로 만들어서 그런지 처음 해 봐서 아주아주 신기했습니닷!
<?xml version="1.0" encoding="utf-8"?>
<LinearLayout xmlns:android="http://schemas.android.com/apk/res/android"
    xmlns:app="http://schemas.android.com/apk/res-auto"
    xmlns:tools="http://schemas.android.com/tools"
    android:id="@+id/main"
    android:layout_width="match_parent"
    android:layout_height="match_parent"
    android:orientation="vertical"
    tools:context=".MainActivity">

    <EditText
        android:layout_width="wrap_content"
        android:layout_height="wrap_content"
        android:hint="숫자 1 입력"
        android:layout_margin="10dp"
        android:id="@+id/edit1" />

    <EditText
        android:layout_width="wrap_content"
        android:layout_height="wrap_content"
        android:hint="숫자 2 입력"
        android:layout_margin="10dp"
        android:id="@+id/edit2" />

    <Button
        android:layout_width="match_parent"
        android:layout_height="wrap_content"
        android:id="@+id/btnAdd"
        android:text="더하기"
        android:layout_margin="10dp" />

    <Button
        android:layout_width="match_parent"
        android:layout_height="wrap_content"
        android:id="@+id/btnCha"
        android:text="빼기"
        android:layout_margin="10dp" />

    <Button
        android:layout_width="match_parent"
        android:layout_height="wrap_content"
        android:id="@+id/btnGop"
        android:text="곱하기"
        android:layout_margin="10dp" />

    <Button
        android:layout_width="match_parent"
        android:layout_height="wrap_content"
        android:id="@+id/btnNa"
        android:text="나누기"
        android:layout_margin="10dp" />

    <TextView
        android:layout_width="wrap_content"
        android:layout_height="wrap_content"
        android:id="@+id/txtResult"
        android:text="계산결과 : "
        android:layout_margin="10dp"
        android:textSize="30dp"
        android:textColor="#ff0000" />
</LinearLayout>
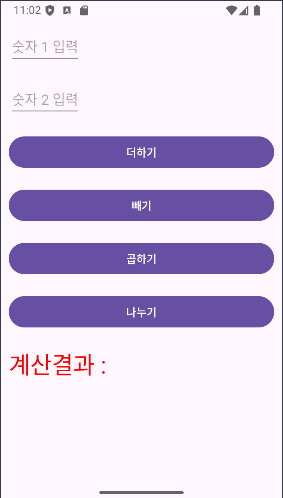
우선 전 레이아웃을 Linear 로 바꿔주었습니다.
그리고 orientation 이라는 값도 넣어줬어요! 선생님 말씀이 이것은 LinearLayout 에서 중요하다고 했습니다.
저희는 수직으로 정렬할 것이기 때문에 vertical 을 넣어주었습니다!
그리고 두 개의 Edit 위젯을 넣어줬어요! 여기에는 자신이 계산하고자 하는 숫자를 넣을 것입니당.
그리고 Button 을 4개 만들어 주었어요! 더하기, 빼기, 곱하기, 나누기 이렇게 네 개를 만들어줬으며,
마지막에는 이 결과값이 나오는 TextView 를 만들어주었답니당.
여기서 이번에는 layout_margin 을 이용했는데요! 요소와 요소 사이 간격을 주는 것을 의미합니당.
그럼 이제 더하기 기능을 구현하기 위한 Main 코드를 보여드릴게요!
package com.example.proj0924_1

import android.os.Bundle
import android.widget.Button
import android.widget.EditText
import android.widget.TextView
import androidx.activity.enableEdgeToEdge
import androidx.appcompat.app.AppCompatActivity
import androidx.core.view.ViewCompat
import androidx.core.view.WindowInsetsCompat

class MainActivity : AppCompatActivity() {

    lateinit var edit1 : EditText;
    lateinit var edit2 : EditText;
    lateinit var btnAdd : Button;
    lateinit var btnCha : Button;
    lateinit var btnGop : Button;
    lateinit var btnNa : Button;
    lateinit var txtResult: TextView;
    lateinit var num1 : String;
    lateinit var num2 : String;
    var result : Int ?= null;

    override fun onCreate(savedInstanceState: Bundle?) {
        super.onCreate(savedInstanceState)
        enableEdgeToEdge()
        setContentView(R.layout.activity_main)

        title = "간단 계산기"
        edit1 = findViewById(R.id.edit1);
        edit2 = findViewById(R.id.edit2);
        btnAdd = findViewById(R.id.btnAdd);
        btnCha = findViewById(R.id.btnCha);
        btnGop = findViewById(R.id.btnGop);
        btnNa = findViewById(R.id.btnNa);
        txtResult = findViewById(R.id.txtResult);

        btnAdd.setOnTouchListener { view, motionEvent ->
            num1 = edit1.text.toString();
            num2 = edit2.text.toString();
            result = Integer.parseInt(num1) + Integer.parseInt(num2);
            txtResult.text = "계산 결과 : " + result.toString()
            false
        }

        ViewCompat.setOnApplyWindowInsetsListener(findViewById(R.id.main)) { v, insets ->
            val systemBars = insets.getInsets(WindowInsetsCompat.Type.systemBars())
            v.setPadding(systemBars.left, systemBars.top, systemBars.right, systemBars.bottom)
            insets
        }
    }
}
이걸 공부하면서도 생소해 보이는 게 아주아주 많았어요!
우선 lateinit 이에요! lateinit 은 직역하면 늦은 초기화라는 말인데용!
그래서 지금 이 값을 초기화하지 않고 나중에 초기화하겠다~ 라는 의미를 가지고 있다고 해서 신기했습니당.
그리고 그 뒤에는 각 변수와 그 타입을 지정해 주시면 돼요! 타입은 위젯 타입으로 하는 게 맞겠죠? 저는 변수명도 아이디와 똑같이 주었습니다.
num1과 num2 는 제가 만든 변수예요!
지금 생소할 수 있는 건 var result : Int? = null 이 문장이라고 저는 생각합니다.
이 문장은 result 의 값을 Int 로 하는데 null 로 초기화 하겠다 라는 의미라고 해요! 그런데 ?가 붙는 이유는 코틀린 문법인 것 같습니다.
우선 저는 title 이 뭔지 의미를 제대로 알지 못해서 지피티한테 물어봤더니 일반적으로는 액티비티 화면의 제목이래요!
여기서도 화면에 보이게 할 수 있지만, 연결을 해주어야 한다고 합니다.
그리고 각각의 변수가 findViewById 를 통해 해당하는 아이디 값을 가져올 수 있도록 찾아올 수 있도록 하였어요!
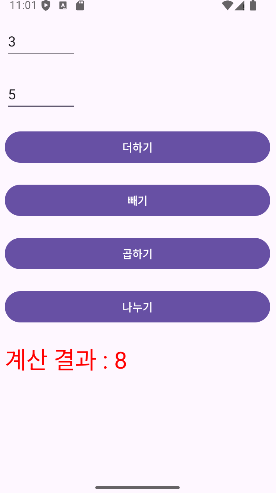
그 다음 코드로 넘어갈게용~ 이제 더하기 기능을 구현할 수 있는 코드예요!
만약 btnAdd 버튼을 터치했을 때, 즉 클릭하였을 때 어떠한 이벤트를 할 것인가를 정해주었어요!
num1과 num2 는 제가 입력한 숫자를 가져와 주는데요! 이 두 개의 변수 타입은 String 이기 때문에 toString() 을 해주었어요!
그리고 이 값을 다시 더해줄 때는 정수로 가져와야 하기 때문에 String 을 Int 로 가져오기 위한 Integer.parseInt() 을 사용해 주었습니다!
더해주기 위해 int 로 바꾼 것이니 제가 원하는 위치에 값을 넣을 땐 다시 toString() 을 이용해 String 으로 바꿔줍니다.
txtResult.text 를 통해 값을 넣어줬어요!
저희가 원래는 setOnClickListener 을 많이 사용하는데요! 아무래도 이것이 더 좋습니다!
왜냐하면 위 코드에서 보시다시피 setOnTouchListener 은 리턴값이 있어야 하기 때문입니다!
이때의 return 값을 false 로 주었어요!
또 중괄호 다음에 이상한.. view, motionEvent 라는 것이 OnClick 에는 없어요!
그래서 저는 두 개의 의미는 비슷하기 때문에 OnClick 을 사용하는 것을 더 추천!합니다.
이것이 setOnTouchListener 코드!
        btnAdd.setOnTouchListener { view, motionEvent ->
            num1 = edit1.text.toString();
            num2 = edit2.text.toString();
            result = Integer.parseInt(num1) + Integer.parseInt(num2);
            txtResult.text = "계산 결과 : " + result.toString()
            false
        }
이것이 setOnClickListener 코드!
btnAdd.setOnClickListener {
	num1 = edit1.text.toString()
    num2 = edit2.text.toString()
    result = Integer.parseInt(num1) + Integer.parseInt(num2)
    txtResult.text = "계산 결과 : " + result.toString()
   }
입니다! 조금 더 간단한 게 보이시나요?
오늘은 요기까지!! 배웠고 결과값은 맞게 나옵니당.
저는 빼기, 곱하기, 나누기 등을 더 만들어 주러 가겠씁니닷!
모두 파이팅!!!!!!!!!!!!!!!!!!!!! ^o^
+ 빼기, 곱하기, 나누기 코드 공유
btnCha.setOnClickListener {
            num1 = edit1.text.toString();
            num2 = edit2.text.toString();
            result = Integer.parseInt(num1) - Integer.parseInt(num2);
            txtResult.text = "계산 결과 : " + result.toString()
        }

        btnGop.setOnClickListener {
            num1 = edit1.text.toString();
            num2 = edit2.text.toString();
            result = Integer.parseInt(num1) * Integer.parseInt(num2);
            txtResult.text = "계산 결과 : " + result.toString()
        }

        btnNa.setOnClickListener {
            num1 = edit1.text.toString();
            num2 = edit2.text.toString();
            result = Integer.parseInt(num1) / Integer.parseInt(num2);
            txtResult.text = "계산 결과 : " + result.toString()
        }
별로 수정한 코드는 없지만!!!!! 값은 맞게 나옵니당.
여러분도 한 번씩 도전해 보세요~
'레쭈고 코틀린' 카테고리의 다른 글
| Kotlin 7차시 (3) | 2024.10.21 |
|---|---|
| Kotlin 6차시 (3) | 2024.09.27 |
| Kotlin 4차시 (3) | 2024.09.13 |
| Kotlin 3차시 (1) | 2024.09.06 |
| Kotlin 2차시 (1) | 2024.09.04 |